Featured

    Featured Posts

  • How to use Shortcut keys in USD
  • Create Timer behavior with action calls

Using Notifications in USD 2.2

I would say, This post is an extension to Neil’s USD – Notifications post (link). I want to use it with one another kind-of real world scenario. Let’s say being a Call center Manager, you want to display an important message – “XYZ application processing has been stopped for today, Please make sure you are not accepting calls for this application” to all your agents.


Before USD 2.2, Maybe you can go with DisplayMessage action of CRM Global Manager but not a foolproof one. But the new Notifications in USD2.2 would help a lot in achieving this scenarios more efficiently.


Consider the same scenario and we want to show it whenever the user starts a session and user will have flexibility to stop it. Let's see the steps involved.
  1. Create the hosted control
  2. Create the required “FORM” record with XAML
  3. Create the action calls required to Open the notification, Close the notification, Don’t show again notification
  4. Create the custom event for Don’t show notification


Create the Hosted Control

Note: This step is not required if you have OOB configurations in your Org. If you have OOB configurations, you can use “GlobalNotification” control.


Create a new Hosted control with name “GlobalNotification” and type as “PopupNotificaiton” as shown below. Make sure the control is marked as Global as shown below.

Create Custom Event to handle “Don’t Show again”

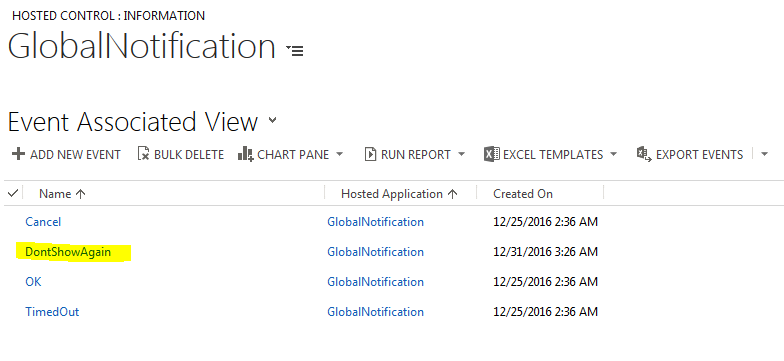
Navigate to Events section of the GlobalNotification hosted control, create a new Event with name “DontShowAgain” as shown below.


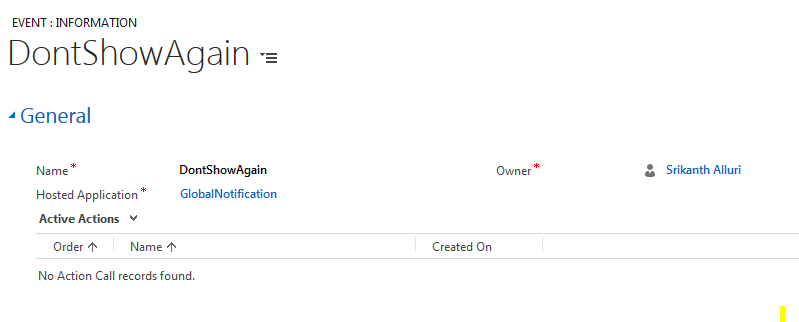
After save&close, this is how you should see the events of GlobalNotification hosted control

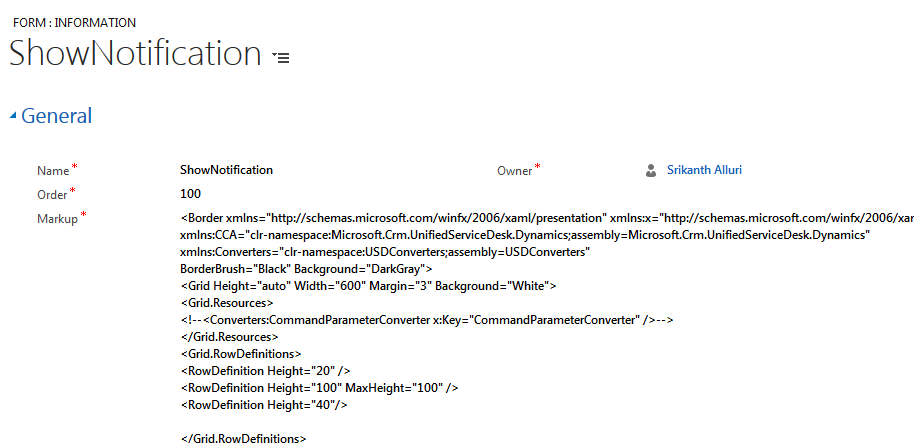
Create a new FORM record for the UI of the message box

Navigate to Unified Service Desk >> Forms and Click on New to create new Form record.
Give the form some meaningful name. In my case I have created with a name “ShowNotification” with the following XAML. Make a note of the Name of the form, later on we are going to use it in action calls as well.


Note: Following is the XAML I have created which I found looking nice :). But you may find it offbeat, make yourself comfortable in making the changes required for your environment, but keep in mind if you are changing any event names/command parameters/replacement parameters etc. then you have to change accordingly further in action calls.

<Border xmlns="http://schemas.microsoft.com/winfx/2006/xaml/presentation" xmlns:x="http://schemas.microsoft.com/winfx/2006/xaml" 
    xmlns:CCA="clr-namespace:Microsoft.Crm.UnifiedServiceDesk.Dynamics;assembly=Microsoft.Crm.UnifiedServiceDesk.Dynamics"
    xmlns:Converters="clr-namespace:USDConverters;assembly=USDConverters"
    BorderBrush="Black" Background="DarkGray">
            <Grid Height="auto" Width="600" Margin="3" Background="White">
                <Grid.Resources>
                    <!--<Converters:CommandParameterConverter x:Key="CommandParameterConverter" />-->
                </Grid.Resources>
                <Grid.RowDefinitions>
                    <RowDefinition Height="20" />
                    <RowDefinition Height="100" MaxHeight="100" />
                    <RowDefinition Height="40"/>

                </Grid.RowDefinitions>
                <Grid Background="#444444" Grid.Row="0" Height="auto">
                    <Grid.ColumnDefinitions>
                        <ColumnDefinition Width="60*"/>
                        <ColumnDefinition Width="40*"/>
                    </Grid.ColumnDefinitions>
                    <TextBlock Foreground="White" Grid.Column="0" 
                               Margin="9,0,0,0" HorizontalAlignment="Left" VerticalAlignment="Center" 
                               FontSize="12" TextWrapping="Wrap" FontFamily="Calibri">
                        <Run Text=":: Message ::" />
                    </TextBlock>

                </Grid>
                <Grid Grid.Row="1" Height="auto">
                    <Grid.ColumnDefinitions>
                        <ColumnDefinition Width="*" />
                    </Grid.ColumnDefinitions>

                    <ScrollViewer VerticalScrollBarVisibility="Auto" Margin="10">
                        <TextBlock Foreground="Black" Grid.Column="0" TextWrapping="Wrap"  FontFamily="Calibri" >
                            <Run FontSize="16" Text="[[$Global.Message]+]"  />
                        </TextBlock>
                    </ScrollViewer>

                </Grid>

                <Grid Grid.Row="2" Background="#F0F0F0">
                    <Grid.ColumnDefinitions>
                        <ColumnDefinition Width="*"/>
                        <ColumnDefinition Width="*"/>
                    </Grid.ColumnDefinitions>
                    <Button Grid.Column="1"  Height="22" Width ="120" Background="Green" Foreground="Black"
                        Command="CCA:ActionCommands.UIIEvent" 
                        CommandParameter="Ok">
                        <Button.Content>
                            <Bold>OK</Bold>
                        </Button.Content>
                    </Button>
                    <Button Grid.Column="0"  Height="22" Width ="120" Background="Green" Foreground="Black"
                        Command="CCA:ActionCommands.UIIEvent" 
                        CommandParameter="DontShowAgain">
                        <Button.Content>
                            <Bold>Don't Show again</Bold>
                        </Button.Content>
                    </Button>
                </Grid>
            </Grid>
        </Border>

And this is how the Form record looks like.


And this is how the design of it looks like.

Now, let's create Action calls

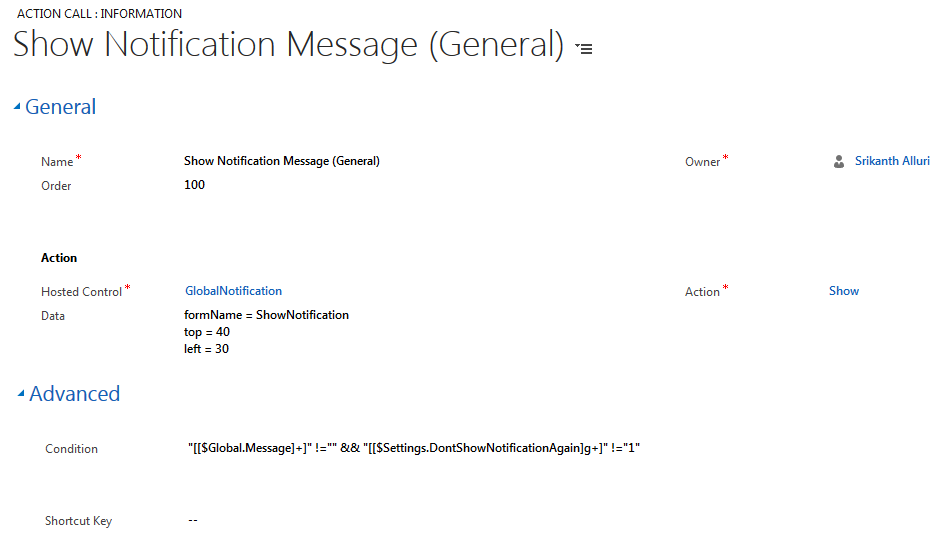
To Open notification: Create a new Action call with the following details.


Name
Show Notification Message (General)
Order
100
Hosted Control
GlobalNotification
Action
Show
Data
formName = ShowNotification
top = 40
left = 30
Preview


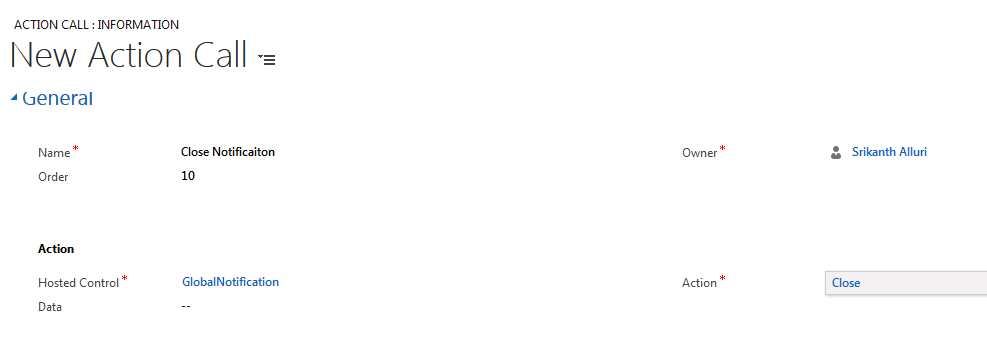
To Close Notification: We need to handle the notification closing if we are working with custom event handlers. Remember we have created a custom event in step 1 for DontShowMessageAgain, we are going to attach this close notification action call later to the event. Create a new action call with the following details.


Name
Close Notification
Order
10
Hosted Control
GlobalNotification
Action
Close
Preview
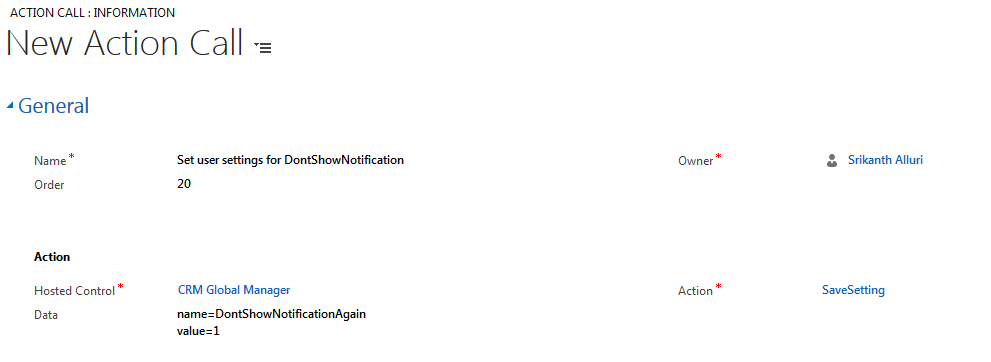
Action call to Create User Setting for Don’tShowagain: Once when user presses don’t show again, we will create a user setting record which we can use in the action call as a condition so that the message won’t popup to user again.


Name
Set user settings for DontShowNotification
Order
20
Hosted Control
CRM Global Manager
Action
SaveSetting
Data
name=DontShowNotificationAgain
value=1
Preview


Now, the last step before closing the action calls, to add the condition for “Show Notification Message (General)”. This action call should only fire

  1. When there is a message to show. The idea is to place the message in the USD Options entity as a setting of USD. This message will then become part of USD’s $Global replacement parameter.
  2. When there is no user settings record for DontShowNotificationAgain.  Basically, when we call the Save Setting action, it would create a new record in User Settings record and further would be available as part of USD’s $Setting replacement parameters.

So, let’s open the “Show Notification Message (General)” action call which we created previously and add the condition as shown below.
Condition
"[[$Global.Message]+]" !="" && "[[$Settings.DontShowNotificationAgain]g+]" !="1"


Finally the action call should look like:


Now, let’s attach the action calls to their corresponding events.


As we want to show the message every time a session is started, The “Show Notification Message (General)” should be attached to “SessionNew” event as shown below.


When user clicks on the “DontShowAgain” button in the UI, we should set the setting and close the message box. So, let’s add both “Set user settings for DontShowNotification” and “Close Notificaton” to the “DontShowAgain” event which we created in step1 as shown below.


That’s it, we have almost assembled all bits. The left out part is the message that we want to show. Let’s create a new Option record. Navigate to Unified service desk >> Options >> Click New and create a new Option record with the following information.


Global Options
Others
Name
Message
value
XYZ application processing has been stopped for today, Please make sure you are not accepting calls for this application
Preview


All right, we are all set to go. Open the USD and start a new session and check, you should be able to see something like this.


Observe that, if you simply click OK and start another session, it will show the same message again. But If you click on Don’t Show Again button, then the message will not come again for further sessions. If you check the user settings now, you should be able to see a record got created automatically with DontShowMessageAgain value set to 1.


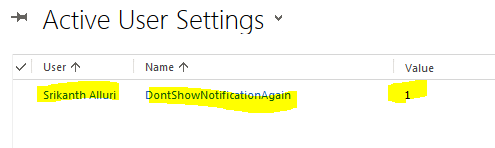
Deleting this record, will pops up the message again to user. Hope this helps in understanding the uses of this Pop up notifications. I can see lot of benefits with this kind of popup messages. The good part of it is, it’s a no code solution again and any admins can easily configure the required messages. Except for the XAML which I think we don’t need to change all the times, just setup once and use the same everywhere :).

I’m exploring further on how to make it time bounded by combining it with my previous post of Javascripts in conditions. Will share you the details further if I found it is interesting. Till then, Happy new year :)

Javascript in “Conditions” of Action calls & WNR

One who have got some exposure on USD, would have definitely observed the big “Condition” box in Action Calls & Window navigation rules (and may be any other entities as well which I haven’t observed so far) where we can mention condition expression which will be evaluated at the run time. Based on the result the corresponding Action call or WNR will execute further.

A very simple example as shown below means - Execute the Action call only if it is “Account” session
image

The idea of this post is to explore what else we can use as conditions ? It turned out pretty nice experiment - One can use almost all JS functions. Except the once which are dependent on Browser object (i.e. Window, Navigator, Screen, History and Location).

Let me quickly go with some examples so that you will have some idea on what I’m trying to say over here.

NOTE: All the below example conditions are tested in debugger view and found working fine.

Ex1: Execute Action call only if the Contact’s Country is USA/US/United States/United States Of America
var cntry="[[contact.address1_country]+]".toLowerCase();
cntry=="us" || cntry=="usa"|| cntry=="united states"||cntry=="united states of america"
image
Note the usage of “toLowerCase()” which is a javascript function, basically we are converting the country in lower case first and then comparing it against the possible values.

Ex2: Execute Action call if the First 2 letters of Customer’s post code is “AB” (I know that sounds a crazy requirement Smile)
"[[contact.address1_postalcode]+]".substring(0,2)=="AB"
image
Observe the usage of Substring, which again is a JS function.

In the same way we can use all other string related functions like indexOf, length, search, match, split, trim etc. Its all just your requirement and find out which one would work for you.

Apart from string functions, Date functions also fulfill some nice requirements.

Ex3: Consider a requirement, If the customer is Created before 2010 then open X lob application else open Y lob application. Isn’t it sounding like a valid requirement ? Lets see how we can achieve this with conditions.

Note: As the main concentration is on Conditions in this post, I’m not going to explain how do we create action calls, associate to events etc over here. Refer Neil’s blog where you can find numerous examples on this front.

Create 2 action calls to navigate X & Y Applications. The condition for X application should be
//Condition for X Application

new Date("[[Contact.createdon]+]").getYear()<=2010
image
The condition for Y Application should be
//Condition of Y application

new Date("[[Contact.createdon]+]").getYear()>2010
image
Observe how we have converted the CreatedOn field in to Date and then took the Year part of the date.

Ex4: Lets say the requirement is, If the contact is created in last 30 days then Open “Recently_Created_Contact_Billing_LOB Application”. Not so crazy requirement, Isn’t it ? Lets see how the condition looks like for this.
new Date("[[Contact.createdon]+]") >=new Date().setDate(new Date().getDate()-30)
In the first look it might be looking slightly complex but all we are doing is, removing 30 days from today and forming a new Date which we are comparing against contact created date.

Ex5: One final example. This time with out any replacement parameters and pure javascript methods. Scenario – On the Last Friday of the month, When ever agent opens USD display a message saying “Today is Last Friday, Don’t forget to update Timesheets & Leaves”. If you see here, This is a generic message to user w/o any session/replacement parameters. Lets see the how the condition looks like.
function LastFridayOfMonth() {

var year=new Date().getYear();

var month=new Date().getMonth()+1;    var i, last_day;    i = 0;    while (true) {      last_day = new Date(year, month, i);      if (last_day.getDay() === 5) {        return last_day;      }      i -= 1;    }

};


LastFridayOfMonth().getDate()==new Date().getDate()


image
Well, The condition might be looking like a beast. But the point to note over here is it is not just single line statemetns rather we can even create big functions which does some crazy caluclations as part of our conditions. (ps: the code for LastFridayOfMonth function is found with some random googling, not pretty sure how far it is working correctly – please test once again if you want to use it).

That’s it for now. Hope this post helps in gaining some idea on how we can use Javascript in conditions. You just need to figure out what function would help you and start using !!

HAPPY NEW YEARSmile,  Probably my last post for the year, See you next year Smile

ps: If you find any limitations in using any JS function, it would be nice if you can post it in comments. Helps others also with limitations.


Load Tabs based on Replacement Parameters

Recently was trying to answer a community query where the user needs to open a standard LOB Application by passing some parameters from the Contact tab.

Yes, that's a pretty standard requirement in many of the USD projects and majority of the times the Admins/dev teams simply tries to configure it with an action call which will be invoked on “SessionNew” event of global manager. I don’t say it is entirely wrong approach, but majority of the times it yeilds in to inconsistent results – the reason being the time it takes to complete the page load and so the replacement parameter. 

There are couple of better solutions (AFAIK) for this to make it more consistent.
a) Use “ExecuteOnDataAvailable” and fire the required action call as sub action to this.
b) Use “BrowserDocumentComplete”, which occurs after the data has been loaded to the Replacement parameters.

In this post, I will go with the Option #b. Option #a, I will take up in next post.

Scenario: Whenever a case has been loaded, If the case Origin is Web then Open the Bing search and pass Case Title to search. 

Following are the steps involved (if you are already using OOB configurations, you can skip the first 2 steps as the hosted controls are already present in OOB configs).

1) Create a hosted control for Case as shown below.
image

2) Create hosted control for Bing application as shown below.
image

3) Create a new action call to Navigate to Bing with query string paramter as the Case title as mentioned below.

Name: Search Bing with Case Title
Order: 10 (any number you want, not really maters at least in this scenario)
Hosted Control: Bing
Action: Navigate
Data: url=http://www.bing.com/search?q=[[incident.title]]
Condition: "[[incident.caseorigincode.name]+]"=="Web"
Shortcut Key: Ctrl+B (Not really mandatory, but having this helps user to quickly come to bing search again if by any chance he closed the tab accidentally).


This is how the action call should look like .
image

4) Open the “Incident” hosted control, Navigate to “Events” associated grid, Open the “BrowserDocumentComplete” event and add the above mentioned action call as shown below.
image
That's it. Now, Whenever you open the case tab (either by session or by its own) it will first loads the full case form and then you can see it automatically loading the Bing search as well after few seconds (basically after loading the replacement parameters) as shown below.
image

Note that this is an example approach and you can use the same kind of approach for any other applications wherever you need to use the replacement parameters.

Hope this helps !! Please share your feedback via comments.

The Case Manager : How many times you can Open the same case ? Nahh…Not more than once !!

One of the problems I faced in previous projects is, An agent is able to open the same case multiple times in the same session (wantedly/unwantedly), at later stages it creates lot of confusion. Recently I found couple of questions on MSDN forums as well on the same point, which made me to spend some time and dig in to a solution.

I must say, it is not a 100% full proof solution, but will definetly do a decent job. I will mention the “cons” with this solution at the end of this post and will provide alternates.

The Solution is “CaseManager”, a hosteed control which will monitor all the cases opening in the session and will keep a track of them based on the case id. For this, I have written peice of code (will push the source code in to Github and will share in saparate post) which I know majority of the USD lovers don’t like. But no worries, You don’t need to write the code – I have attached the required dlls, All you have to do is, copy the dlls in to USD installation folder (typically C:\Program Files\Microsoft Dynamics CRM USD\USD). Let’s go through Step by Step.

Step 1: Extract the Zip file, Copy the CaseManager.dll in to USD Installation folder.


Step 2: Create new Hosted control with following information

Name: CaseManager
USD Component Type: USD Hosted Control
Application is Global: False (Unchecked)
Display Group: HiddenPanel
Application Is Dynamic: No
Assembly Uri: CaseManager
Assembly Type: CaseManager.ManageCases

1

Step 3: Create a new Action for this CaseManager

with name “CaseNavigationTriggered” by navigating into UII Actions of the Hosted control. Please note it is “Action” not an “Action call”. Only name is required, leave all other properties as is as shown below.

2

Step 4: Navigate to Window Navigation rules and open “Default Case” navigation rule.

This is the default navigation rule that will fire when any case is opened until unless any other navigation rule is defined against the source hosted control. Alter the navigation rule as mentioned & shown below.

Action: None
Target Tab : (Clear existing value)
Show Tab : (Clear existing value)

3

Step 5: Create Action calls with the following details.

AC1: Manage Cases

Name:Manage Cases
Hosted Control:CaseManager
Action:CaseNavigationTriggered
Data:url=[[url]+]
          SUBJECTURL=[[SUBJECTURL]+]

5

AC2: CaseManager: Navigate Case

Name:CaseManager: Navigate Case
Hosted Control:Incident
Order:100
Action:Navigate
Data: url=[[CaseManager.NavigateToUrl]+]
Condition: "[[CaseManager.AllowCaseToOpen]+]"=="yes"

6

AC3: CaseManager: Case already opened error

Name:CaseManager: Case already opened error
Hosted Control:Crm Global Manager
Order:200
Action: DisplayMessage
Data: <<Messge that you want to show to user if they are opening same case again>>
Condition: "[[CaseManager.AllowCaseToOpen]+]"=="no"

image

Lastly to set the focus on to the case tab (if we navigate), attach the existing “Show Tab for Case” action call to Second action call ie. AC2: CaseManager: Navigate Case  as sub action. If you didn’t find one in your configurations, create the same with the help of below image.

image

Step 6: The last one. Add all the 3 action calls to the window navigation rule as shown below.

9

Thats it, Now you should be able to see the following error message in USD whenever you open the same case again.

Btw, I thought it is a good to allow to open multiple “NEW” cases, so I haven’t placed any restrictions for new cases Smile.

10

Now, lets have a quick talk about the limitations of it.

a) Open a new case, Save it. Then try to open the same case again from some other place in the same session (like from associated cases grid). This scenario is not handled and I need bit more time to gracefully handle these kind of “wantedly doing” scenarios.

b) Open a case, Close it some how (close the tab) and try to open the case again. System will show the error message. I will try to handle it in next release and will do a continution post. However, the OOB configurations of case will not allow you to close the tab directly (there is no “X” button to close), so I think this can be considered partially handled Smile.

These are the 2 scenarios, I can see are failing. Please comment if you have any other scenarios.

The Case Manager dll is available at (attachment) : https://drive.google.com/file/d/0BxR-ns-wP3gLeTZuRjd4VDE3TW8/view?usp=sharing

Hope this helps, All the very best Smile !!

Stop session close incase of Unsaved changes in the entity record.

It's been pretty long since I touched my blog. It's all the new role I took up and crazy work life. Anyways, with the inspiration stolen from Mr. Parkhurst the MVP, the USD "geek" - I will try to be in touch with my readers as much as possible through my posts and comments.
One of the previous projects, the requirement is something like - "Agents should be alerted before closing the session in case of any unsaved changes are there in the Contact/account/Case form they are working on". The OOB behavior of USD is, it will through "Leave/Stay on page" dialog and not even waits for user to respond rather it will simply kills all tabs. Unfortunately, we are not able to find a solution for this problem at that time and so we ended up "masking" the requirement with some generic warning.
In some investigation & reading today, I got this idea which brings the absolute fit solution for this problem. Note that, this is bit of lengthy solution for now - I'm still trying to make it more simpler and will let you all know in a different post if I got succeeded. The good part is, It's a "NO CODE" solution, which many of my friends out there like a lot :)
The solution involves,
a)Create action call for each entity you want to check for changes
b)Attach action call to "session close requested" event
c)Alert user with display message if any unsaved changes found and stop closing session.
Note, For the sake of the blog post, I have considered Account form changes. You need to repeat the same for all other required entities in your project.
  1. Create Action call to check if the form is Dirty.
Use the RunXrmCommand action of "Account" hosted control and call the following script which simply checks if the form is Dirty and returns Yes/No. (At this juncture, take a second and Refer this https://neilparkhurst.com/2016/03/26/usd-return-results-from-a-runxrmcommand/ wonderful blog of Neil on RunXrmCommand to know how to use this action and how to take the result from Action).

function IsAccountDirty() {

   return Xrm.Page.data.entity.getIsDirty()==true? "yes":"no";

 }

IsAccountDirty();
Note: I don't know if it is a bug or what, but the RunXrmCommand is returning result only if the return value of the command is string. Henceforth, I'm using If condition and returning Yes/No.
1
  1. Attach Action call to "SessionCloseRequested" Event.
This is the event USD automatically fires whenever user closes a session. If you are using predefined configurations, You might have already observed MS is using this event to check notes is saved or not and then closing the session. We are going to use the same event to check our Account form status. Attach the action call to the event as shown below.
2
So, whenever this event executed it will set the $Return.IsAccountDirty parameter with Yes/No based on the Unsaved changes in the Account form. (FYR, here is a quick screenshot of debugger).
3
  1. Stop session closing and showing an Alert to user.
Create a new action call with below information to display the message to user if the form is "Unsaved".
Name : Tell user about Unsaved changes in Account
Hosted Control : CRM Global Manager
Action : Display Message
Data : Hey, Account form has unsaved changes. You can't close the session like this.. :) (Or whatever the message you want to show)
Condition : "[[$Return.IsAccountDirty]+]"=="yes" (Meaning, we want to execute the action call and show the message only if IsAccountDirty is "yes".)
4
Attach this action call to the same "SessionCloseRequested" event as shown below.
5
Next, Stopping the Session close. Navigate to action calls, find for the action call named "Close Session". Add a condition to check if the AccountIsDirty which stops the execution of action as shown below.
6
That’s it, we are done. Open USD, Start a session change something on the account and try to close the session without saving the changes ..
7
Wolaa.. :)
Hope this helps you guys, All the best !! Please share your thoughts through comments !!

Just "Trace" it


It's been quite a while by looking into this simple .NET feature which helps a lot in finding out issues in Live applications. The other day we struggled in implementing Trace functionality for our ongoing application and surprisingly we were unable to find significant/straightforward help.
Thought it would be good if I can draft it in simple terms which may be useful for all (at least for my later reference :) ).
When we are talking about Trace, we should know about 3 main elements.
1) Sources : Trace source is the component which actually generates all the trace data, Define the required listeners for this source to track the trace information. An "application" can have more than one trace source, typically it will be defined per module of the project. For example, you can define one source for your helpers module which logs only Error and another source for your service project where you can log both Errors & warnings as well if you want.
This is how a typical trace source config looks like. ( I'll discuss about the Switches mentioned in the below block further in the post, don’t worry about it for now).


<system.diagnostics>  


<sources>  


<source name="Source1" switchName="MySwitch" switchType="System.Diagnostics.SourceSwitch" >  


<listeners>  


</listeners>  


</source>  


</sources>  


</system.diagnostics> 


2)Listeners : Trace listener listens for data on a particular source and dumps into the required location as defined by the listener type. There are some default providers MS provides and more detailed description of these listener types is available at https://msdn.microsoft.com/en-us/library/4y5y10s7(v=vs.110).aspx.
Typical trace listener looks like..


<listeners>  


<add name="listner1" type="Microsoft.VisualBasic.Logging.FileLogTraceListener, Microsoft.VisualBasic, Version=10.0.0.0, Culture=neutral, PublicKeyToken=b03f5f7f11d50a3a"/>  


</listeners> 


*There is a concept called "Shared Listener", as the name suggests, this listener can be shared with multiple sources if required. To use shared listeners, the config should be


<sources> 


<source name="Source1" switchName="MySwitch" switchType="System.Diagnostics.SourceSwitch" >  


<listeners>  


<add name="sharedlistner1"/>  


</listeners>  


</source>  


</sources>  


<sharedListeners>  


<add type="Microsoft.VisualBasic.Logging.FileLogTraceListener, Microsoft.VisualBasic, Version=10.0.0.0, Culture=neutral, PublicKeyToken=b03f5f7f11d50a3a"  


name="sharedlistner1"/>  


</sharedListeners> 


3)Switch : Trace switches are basically On/Off configuration for Trace enable/disable. In addition to simple On/Off, you can define Trace only errors or only warnigs etc. One thing to remember over here is trace swithc follow heirarchy ie. If Trace switch is for "Information", it will log Error+Warning+Information, in the same way, if it is for "Warning", it will log Error+Warning.
The configuration of switches would look like..


<switches>  


<add name="MySwitch" value="Information"/>  


</switches> 


So, finally the whole configuration would look like..


<system.diagnostics>  


<trace autoflush="true"/>  


<sources>  


<source name="Source1" switchName="MySwitch" switchType="System.Diagnostics.SourceSwitch" >  


<listeners>  


<add name="sharedlistner1"/>  


</listeners>  


</source>  


</sources>  


<switches>  


<add name="MySwitch" value="Information"/>  


</switches>  


<sharedListeners>  


<add type="Microsoft.VisualBasic.Logging.FileLogTraceListener, Microsoft.VisualBasic, Version=10.0.0.0, Culture=neutral, PublicKeyToken=b03f5f7f11d50a3a"  


name="sharedlistner1"  


BaseFileName="test"  


Location="Custom"  


CustomLocation="C:\temp\"  


LogFileCreationSchedule="Daily"  


traceOutputOptions="DateTime">  


</add>  


</sharedListeners>  


</system.diagnostics> 


Some of the points to look at in the configuration a) Look at the 2nd Line, Trace Autoflush set to True, this is mandatory to flush the data to file.
b) In the listeners, though we have added only 1 listener (ie shared listener), .NET by default adds one another listener (you can observe it in debug mode of the application), you can remove the default listener by adding like
c) Check the additional attributes in the shared listener. Though you see a warning message for all the additional attributes, don’t worry about them, compile the code it should work.
d)To define a custom path for your trace file, the location should be "Custom" and then mention the CustomLocation attribute. Make sure the folder exists already if you are using CustomLocation.
e) You can use the predefined locations like LocalUserAppdata etc in the Location tag.
Finally, to use the trace logging in the source


TraceSource log = new TraceSource("Source1");  


log.TraceData(TraceEventType.Error, 1, "test error message");  


log.TraceData(TraceEventType.Information, 2, "test information message"); 


** This has been provided as a simple example. In real world you would like to create a nice wrapper for all your log/trace mechanism and provide simple, easy to use helper methods to log the messages.
Hope this helps, Happy coding !!

www.CodeNirvana.in

Translate

Total Pageviews

Copyright © CRM Ramblings | Designed By Code Nirvana